|
Merging of the Images
This appeared as an article in Amateur Astronomy Magazine, Issue 86, Spring 2015, pages 10-15, under the title
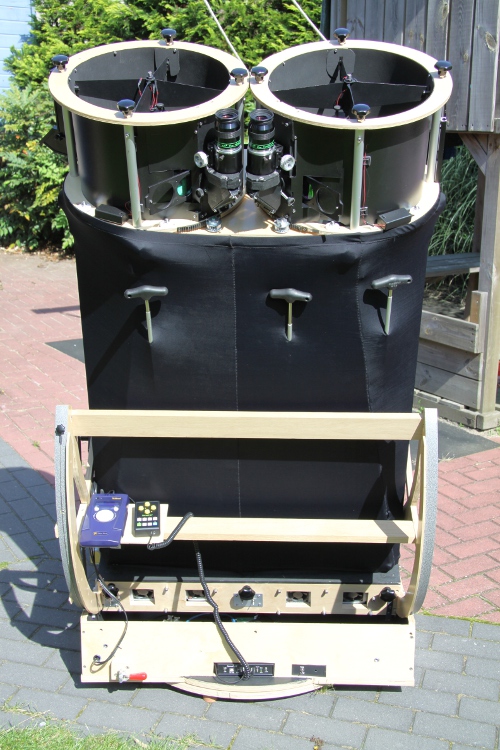
Probably one of the most challenging and difficult aspects of a binoscope is that the two independent optical systems have to produce two images that are well collimated and accurately merged at the same time. In principle, merging is nothing else than that the optical paths of the two telescopes are brought together to create overlapping images. If all parts of the two optical paths would be perfectly collimated and aligned, if all the angles of the scope would be perfectly square, if all mirrors (primary, secondary and tertiary) and the focusers would be centred perfectly, then also images would be well-collimated and merged. Alas, no such thing as perfect exists, so images will probably not be perfectly collimated and will not be merged. There are two main approaches to merge two well-collimated images: 1) you move one half of the binoscope in relation to the other half or 2) you only move the two optical paths in order to overlap each other. I've followed both approaches.
Merging of the images by tilting an entire half of the binoscope
The disadvantage of this approach is though that the system is mechanically challenging. Specifically, when you move the 'half-binoscope' up and down, images are more prone to 'de-merge', since changes are that there is some remaining play in the system. Indeed, in my hands there always remained residual play in the threaded rods I used and that resulted in some separation of the images when moving the scope up and down.
Merging of the images by tilting the primary mirrors
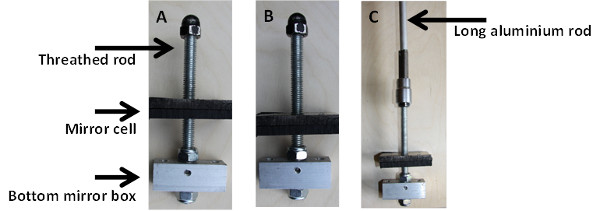
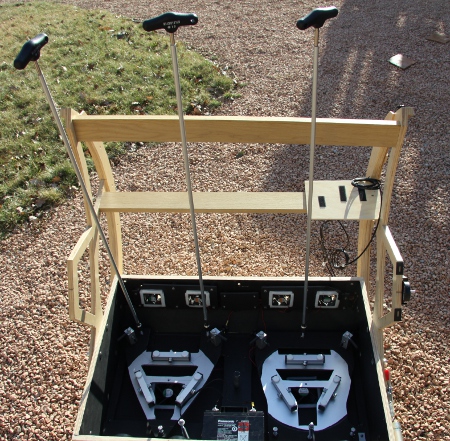
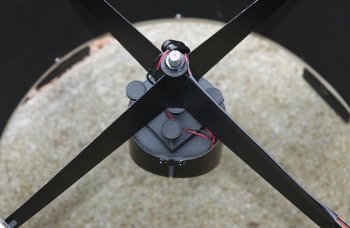
This is no real mirror cell, but an illustration of how collimation of the primary mirrors is achieved. A threaded rod goes through and through both the mirror cell and the bottom of the mirror box (A). When turning the knob, the mirror cell, and thus the primary mirror, moves up and down (compare A and B). This is an exaggeration, merely to illustrate the principle. A long aluminium rod (C) can be used to turn the collimation bolts (see also the next picture). When turning the threaded rods, the mirror cell 'travels' up and down. I use long aluminium rods with handgrips to perform the task of turning the collimation bolts (picture below). This allows that one can follow the movements of the Barlowed laser donut while turning the collimation bolts. No need to go back and forth to the bottom of the mirror box to adjust the collimation bolts. In addition, the handgrips are at shoulder height, which makes the merging procedure much easier (see below).
Step 3. Merging of the images by de-collimating the primary mirrors
Now the advantage of the long aluminium rods become apparent. Others rapport the use of Servomotors to adjust the collimation bolts for merging. And at the other end of the spectrum, people place the collimation bolts in a traditional way so that they have to be adjusted from underneath the mirror box. This means one has to go back and forth to monitor the merging, very much like collimation is performed in a traditional Dobsonian telescope. The way I describe here is a simple and very practical alternative for the more sophisticated use of Servomotors.
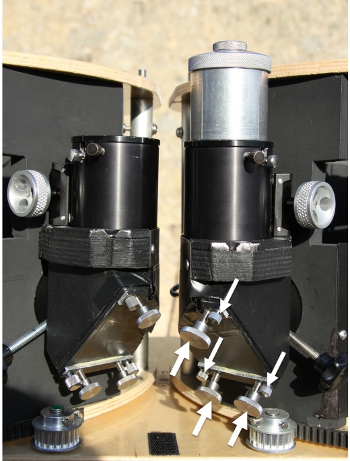
Step 4. Re-collimation of the primary mirrors by adjusting the screws on the secondary mirror holders
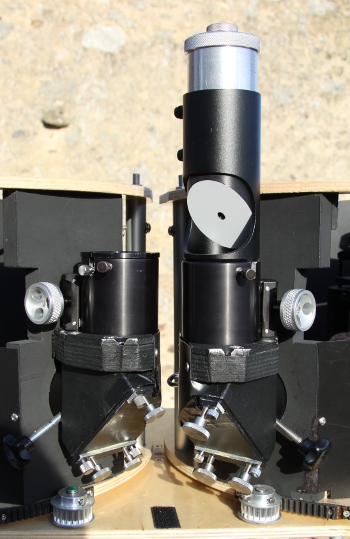
I found out that an effective way to re-collimate the mirror systems is to simply adjust the screws on the secondary mirror holders that are normally used to collimate the secondary mirror (picture below)
In the binoscope, tilting the secondary mirrors is used to collimate the primary mirrors! To follow collimation of the primary mirrors, I place the single beam laser in the so-called Howie Glatter tuBLUG (picture below). However, I also used a Cheshire with the same results.
With the tuBLUG, collimation is easy to accomplish, because you can see the Barlow donut move while standing behind the binoscope (pictures below). The movements in the middle and right pictures below indicate the degree of de-collimation of the primary mirrors.
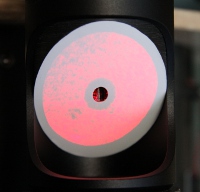 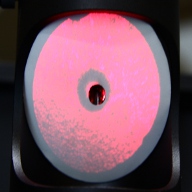 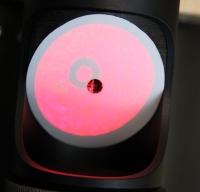
The small opening of the Barlow lens should still be within the larger area of the Barlow donut (somewhat as in the middle picture above). In principle the tertiary mirrors will be out of collimation after adjusting the screws on the secondary mirrors. In practice the effects are neglectible, so I don't touch the tertiary mirrors again. So upon re-inserting the eyepieces and returning to the stars, they are probably very well merged by now. If not, again tweak the primary mirrors collimation rods for merging and then collimation of the primary mirrors by tilting the secondary mirrors. This re-iteration of the steps 3 and 4 has to be done at most one or two times.
This entire procedure differs from the normal collimation procedure of a mono-Dobsonian telescope:
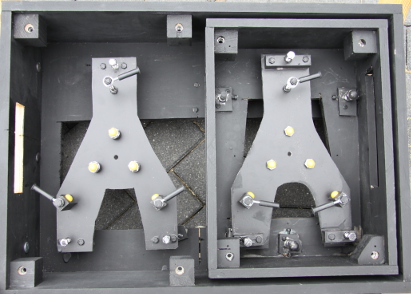
Not only that, when the entire binoscope structure is rigid enough, images will stay merged when moving the scope up and down. In fact, mechanically, this is not different from a mono-Dobsonian telescope. Once a mono-Dobsonian telescope has been well-collimated and when it's structure is rigid enough, collimation will stay virtually the same when moving the telescope up and down. Since merging of the images in a binoscope is strictly dependent on the collimated state of the optical systems, a rigid binoscope structure in which collimation does not change, will result in well-merged images as well. Horizontal and vertical merging of the images Note that the collimation bolts of the two mirror cells (see the black arrows in picture below) are not placed at the same positions. The right mirror is collimated by two bolts closest to the mirror support, the left mirror is collimated by one bolt that has been placed between the mirror support, and another bolt at the left upper side of the mirror cell. As I will explain below, this is a rather critical aspect of the binoscope, since it protects the observer from bad headaches!
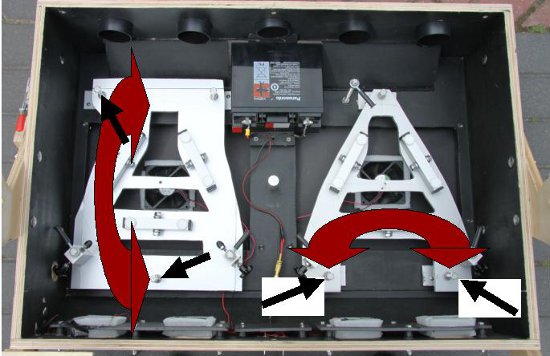
What does this imply? By turning only one of the two bolts of the RIGHT mirror cell, the right mirror will be tilted in a 'left-right' fashion, parallel to the long side of the mirror box. In contrast, by turning the one bolt of the LEFT mirror cell that is placed between the mirror support, the mirror will be tilted in an 'up-down' fashion, square to the long side of the mirror box. The large red arrows show these respective movements of both mirror cells that in principle must be perpendicular to each other. Why this seemingly complex procedure? The answer lies in the way image merging is done (actually HAS to be done) in practice. With only two collimation bolts, placed at the bottom of the right mirror cell, the images can in principle be merged. Turning both collimation bolts simultaneously in the same direction, will move the images vertically up or down. But in the end, with only these two collimation bolts available, the images will have to be merged in a horizontal movement. I noted that when the images come close enough together, the brain will interfere and snap the images together instantaneously. This while you know that 'mechanically' they were not fused yet by the turning of the collimation bolts. It becomes a cause of constant eye strain, and a bad headache as the end result of a night observing!
This can simply be avoided by independently tilting the left mirror to move the left image vertically up and down.
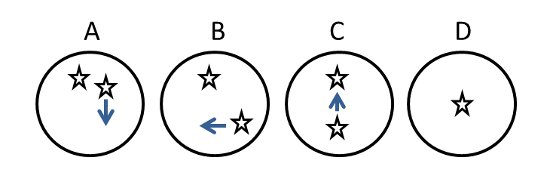
Why does it work this way? The brain can only snap together close images when they lie on the same axis as the eyes and that is horizontal. Not vertical misaligned images!!! So by purposely keeping the images vertically misaligned at first, you can now see where the 'real' horizontal merging point is, without the interference of the brain! Again, following this simple procedure avoids one getting headaches! Conclusion This article is intended to show that one, if not the most difficult aspect of building a binoscope, namely the merging of images, can be adequately handled, when taken proper precautions. De-collimated images as a results of merging procedures can be easily restored to sharp images. This can be achieved in a simple manner, without the need to go back and forth to operate collimation rods that are positioned below the binoscope. Or, at the other end of the spectrum, neither are fancy Servomotors needed to merge the images. All of the potential problems can be avoided and solved in a relatively simple way. This example serves to show that the bias against building a binoscope because of its complexity is not justified.

|